How to Add Media Files in WordPress

A white, rounded square logo with an abstract S-shaped design on a gradient blue and purple background.

When you are creating a website, you want to add media files to keep your audience interested. The WordPress dashboard makes it easy to manage and insert your media files. The steps below outline how to upload and insert media files into your website.

Step One

Hover your mouse over “Media” on the left side menu and click the “Add New” button.

Screenshot of a WordPress dashboard showing the "Add New" option under "Library" in the "Media" menu. A yellow box with an arrow and text says, "Click here." This image demonstrates how to add media files in WordPress.

Step Two

You can either “drag and drop” your media files from your computer into the box or click “Select Files”

 Screenshot of a WordPress interface showing the "Upload New Media" section with a "Select Files" button and a message on how to add media files in WordPress by clicking or dragging and dropping files to upload.

Step Three

If you chose “Select Files,” find the media on your computer that you would like to upload to your website. Select your files then click “Open.”

Screenshot of a file upload window showing various folders. A yellow highlight box around the 'Open' button at the bottom right and a red arrow pointing to it with the text "Select your files then click here." Perfect for instructions on how to add media files in WordPress.

Step Four

Your image has now been uploaded to your website. Fill out the title and alternative text fields. Then click “Save All Changes.”

A file upload page with fields for file name, type, upload date, dimensions, title, alternate text, caption, and description. A "Save all changes" button is highlighted at the bottom left. Navigate through "How to Add Media Files in WordPress" to better manage your uploads.

Step Five

Select the particular post/page to which you want to add the media. Next, click the “Upload/Insert” button to insert your media.

Screenshot of a WordPress editing page for "About Us," showing a blank text editor with an arrow pointing to the "Upload/Insert" button. This illustrates how to add media files in WordPress, making it easy to enhance your content with images and videos.

Step Six

You already added your media to the library earlier in this tutorial. Now you need to access it. Click the “Media Library” button to view all the media on your website.

Screenshot of the WordPress "Add Media" window, highlighting the "Media Library" tab and showing options to upload files from a computer. Learn how to add media files in WordPress with ease through this user-friendly interface.

Step Seven

All of your media files should be displayed. Find the media file that you want to insert on the website and click the “Show” button.
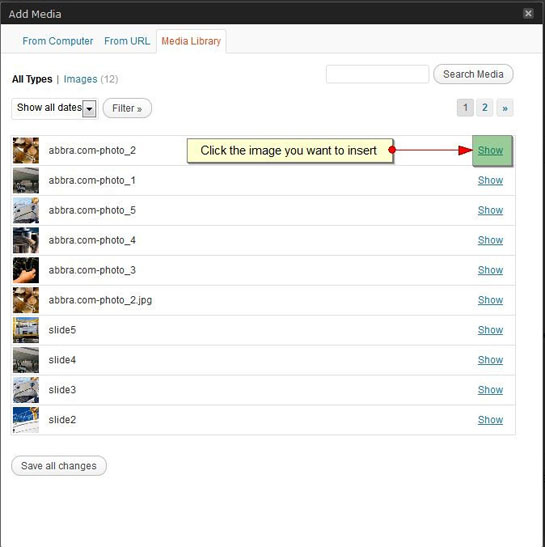
A screenshot of a media library interface showing a collection of image files. Each file has a "Show" button next to it, and an instructional arrow points to one of the images, illustrating how to add media files in WordPress.

Step Eight

After you have selected your media file, choose your alignment and size settings. Then click the “Insert into Post” button. Congratulations, your media file has now been inserted into your post/page.

Screenshot of the Add Media interface in a website content management system. The user is learning how to add media files in WordPress by uploading an image and selecting size settings before clicking "Insert into Post.


Share This
Blog Decorative Background

Join the Sales and Marketing News, receive our last insights, tips and best practices.

Our 7 Guarantees

Keeping 2,000+ Clients Happy Since 2001.

1
You Will Love Your Design We design to please you and your clients
2
Same-Day Support 24-hour turnaround edits during business hours
3
Free Education We provide knowledge to help you expand
4
No Hidden Charges We quote flat-rate projects
5
Own Your Site No strings attached
6
We Create Results SEO, PPC, content + design = clients
7
We Make Life Easier One agency for web, branding and marketing