How to Use GTM and GA4 to Track Mobile Phone Clicks (Updated 2026)

If you have a website and you want to know how it’s performing, you should be tracking the types of conversions that are specific to your business and marketing goals. Doing so will help show if your efforts are producing a high return on investment. You need to know if your strategies are working or not in order to best invest your time and your money.
At PaperStreet we primarily track contact form completions and mobile phone number clicks. Have you ever wondered how many people view your website and click your phone number to call? If so, this tutorial will show you step-by-step exactly how to set this up from the very beginning.
Please do not be intimidated by the length of this post. Our tutorial goes into extreme detail so you don’t miss any steps. We’ve also provided screenshots to help you reference where to look.
For the purposes of this tutorial, Google Analytics will be referred to as “GA” and Google Tag Manager will be referred to as “GTM”.
Initial Setup with GTM
- Login to Google Analytics to make sure Google Tag Manager is setup under the same account
- Go to the URL https://tagmanager.google.com/
- Click “Create Account” at the top right corner
- Add your business name where it says “Account Name” then click “continue”
- Add in your website where it says “Container name”
- Select the appropriate container type. Since we are setting this up for websites, select “web” and then click “create”

- Read and accept the GTM Terms of Service Agreement
- Install the tracking codes appropriately within the suggested locations

Setup Variables, Tags and Triggers in GTM
- On the Workspace tab, click on “Variables” on the left-hand side
- Click on “Configure”
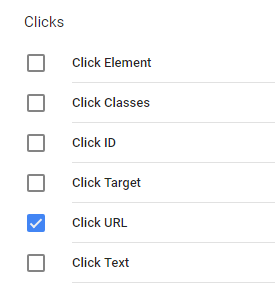
- Scroll down to the “Clicks” section and select the checkbox for “Click URL” then exit
- Now click on “Triggers” on the left-hand side and then click “New”

- Name the “Untitled Trigger” to be “Phone Number Trigger”
- Then click “Choose a trigger type to begin setup…”
- Under the “Click” section choose “Just Links”

- Check “Wait for Tags” and leave the default max wait time to be 2000
- Check “Check Validation”
- Where it says “Enable this trigger when all of these conditions are true” change it to be: Page URL matches RegEx .*
- Where is says “This trigger fires on” click “Some Link Clicks” and change it to be: Click URL contains tel:

- Then click “Save” at the top right corner
- Now click on “Tags” on the left-hand side and then click “New”
- Name the “Untitled Tag” to be “Phone Call Click”
- Under “Tag Configuration” click on “Choose a tag type to begin setup…”

- Select “Google Analytics: GA4 Event”

- Under “Configuration Tag” select “None – Manually Set ID”
- For the “Measurement ID” this would be the ID associated with your GA4 account. You can find this by going to Admin > Data Streams > Then click on your stream and you’ll see “Measurement ID”

- Put “phone _call_click” for the Event Name
- Click on “Event Parameters” and add 2 rows
- Fill them out accordingly based on this image below

- The purpose of this is to show you what phone number was clicked and the page URL it occurred on for more comprehensive metrics
- Scroll down to “Choose a trigger to make this tag fire…”
- Select the “Phone Number Trigger” that we previously setup then click “Save” at the top right
- Once that is complete, we want to preview and debug our tag/trigger before we publish it.
Preview and Debug
- Click back to the “Workspace” tab
- Click “Preview” in the top right next to “Submit”

- A pop up window will appear asking you to “Connect Tag Assistant to your site”
- Enter your website’s URL and click “Connect”

- Your website should load in a new window and there will be a “Tag Assistant” section in the bottom right corner
- Now test by clicking on a linked phone number on your website, then go back to the previous Google Tag Manager tab
- Under the Summary, you should see “Tags Fired” and “Phone Call Click” should appear
- If you are not seeing that then it’s possible that you overlooked a step in the tutorial
- Once everything is working correctly you will want to then click “Submit” to make your tag go live
Google Analytics 4 Goal Setup
- Now we need to log back into GA4 to set up this new GTM event to be counted as a conversion goal.
- Select “Configure” from the left hand menu
- Click on “Conversions”
- Click on “New conversion event”
- For the “Name your event” field put phone_call_click (or whatever you used in the previous step 5)
- Click “Save”

Further Learning
Are you interested in learning more about legal marketing? Head on over to our SEO Guidelines & Best Practices page. Our guide will teach you the do’s and don’ts for law firm SEO along with what we include in our SEO plans.
Questions or Feedback?
We would love to hear your feedback if this blog post has helped you. Please feel free to let us know in the comments below.
If you need any assistance setting up conversion goals for your website, we are here to help. Please feel free to contact us if you need assistance.
What you should do next . . .

SEO doesn't happen in a vacuum. Always be looking to continually improve and be open to changing landscapes.
Join our newsletter, where you will learn educational info on latest insights, tips and best practices.
Share:
About Us
Did you know more than 200 clients have worked with PaperStreet for more than 10 years?
Get a Free Website
Analysis and Consultation
Marketing Services