Connecting Contact Form 7 to a CRM
In this post, we will demonstrate how to connect your Contact Form 7 form to a CRM API in 3 easy steps.
Step 1: Find Your CRM’s Documentation
This will give you all the crucial data you need to integrate your form into their CRM. Here is an example of excellent documentation from Captorra’s API.
For our purposes here, we will assume the existence of a made-up API with the following requirements:
- Method: POST
- URL: https://example.com/api/create
- ID field – 111111
- Referrer field – 123456ABCDEFGHIJKL120481938249
- First-Name field
- Last-Name field
- Email field
- Phone field
- Comments field
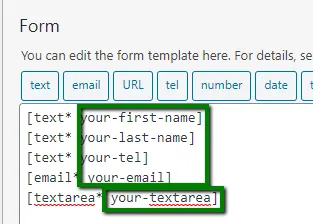
Step 2: Find the Field Names From Your Form
This step will differ depending on what fields your form has, what they are named, and what you actually want to send to the API. First, open up the form in the backend and identify what fields you would like to send to the API and what their names are.
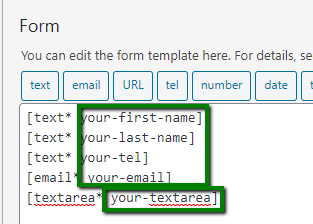
In the screenshot above, I chose five fields to send over to my API, which correlate to the five fields that my API requires.
Step 3: Add Code to functions.php
The code below can be copied and inserted into the functions.php file, with a few modifications to fit your API needs.
function action_wpcf7_mail_sent( $contact_form ) {
  // CF7 methods to get current submission
  $wpcf7      = WPCF7_ContactForm::get_current();
  $submission = WPCF7_Submission::get_instance();
  if ($submission) {
    // Initialize POST data from form.
    $data = $submission->get_posted_data();

    // Setup associative array which will be sent to API. Check API docs for required fields and names.
    $rawBody = [
      "ID" => "111111",
      "Referrer" => "123456ABCDEFGHIJKL120481938249",
      "First-Name" => $data['your-first-name'],
      "Last-Name" => $data['your-last-name'],
      "Email" => $data['your-email'],
      "Phone" => $data['your-tel'],
      "Comments" => $data['your-textarea']
    ];

    // Encode array into JSON
    $body = json_encode($rawBody);

    // CURL setup to send the data.
    $ch = curl_init();
    // Change this with URL destination for API. Check API docs.
    curl_setopt($ch, CURLOPT_URL, 'https://example.com/api/create');

    // Probably don't need to change any of this stuff. Fairly standard.
    curl_setopt($ch, CURLOPT_CUSTOMREQUEST, 'POST');
    curl_setopt($ch, CURLOPT_RETURNTRANSFER, 1);
    curl_setopt($ch, CURLOPT_HTTPHEADER, [
      'Content-Type: application/json; charset=utf-8',
      'Accept: application/json'
    ]);
    curl_setopt($ch, CURLOPT_POST, 1);
    curl_setopt($ch, CURLOPT_POSTFIELDS, $body);

    // Send
    $response = curl_exec($ch);
    curl_close($ch);
  }
};

add_action( 'wpcf7_before_send_mail', 'action_wpcf7_mail_sent', 10, 1 );
There are really only two sections that are most likely to be modified, the $rawBody variable and the CURLOPT_URL, which will be the endpoint for your API.
You can see above that the $rawBody is an associative array with the keys set to the field names from step 1 and the values set to the field names from step 2.
The final step is to test your form and check if you have received an entry in your CRM!
Questions? We Are Here to Help
If you need assistance or have questions about connecting a Contact Form 7 to a CRM, contact us today. We will be glad to help!
What you should do next . . .

Join our newsletter, where you will learn educational info on latest insights, tips and best practices.
Share:
About Us
Did you know more than 200 clients have worked with PaperStreet for more than 10 years?
Get a Free Website
Analysis and Consultation
Marketing Services