5 Ways to Make Your WordPress Tasks More Efficient

As a former intern, I understand just how time consuming performing bulk tasks in WordPress can be. Tasks can range into the tens of hours just for one site at times, and it’s often not possible to devote that much time to one task. Naturally, there must be some way to streamline this work and that’s what I aim to explain with this post. .
Utilize “Better Search and Replace” for Bulk Content Updates.
Often you’ll be tasked with finding and replacing every instance of particular words, phrases or titles. For example, if a company decides to change their name that name is going to be needed to change site-wide. Manually changing these would take an inordinate amount of time and actually finding every instance is nigh impossible. However, Better Search and Replace performs both of these actions for us.

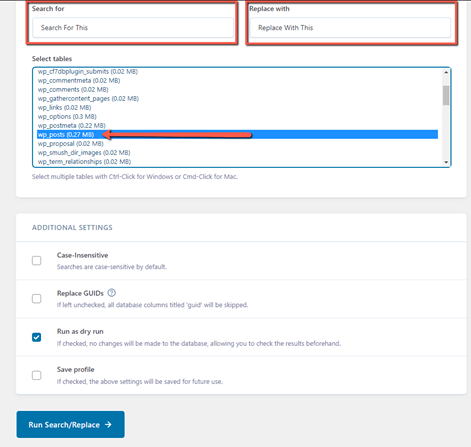
Simply enter what you want to replace on the left ,what it should be replaced with on the right, and select wp-posts or whatever the most similar option is from the available database options below.
Bonus Tip: Always make sure “dry run” is checked first to see how many changes need to be completed in order to make sure it would perform as expected. Once you’ve verified the expected number of changes, uncheck dry run, and let it work its magic!
Utilize a Text Cleaner When Uploading Bulk Content
More often than not, if you’re bulk uploading content, the content being sent to you en masse via a collection of Google Docs or Word documents. The problem with both of these is that simply copy and pasting the content into your WordPress page will create styling conflicts with your website as both Word and Google Docs have their own styling on them. We often refer to content brought over in this way and not cleaned as “dirty content.” This is where a text cleaner site comes in.

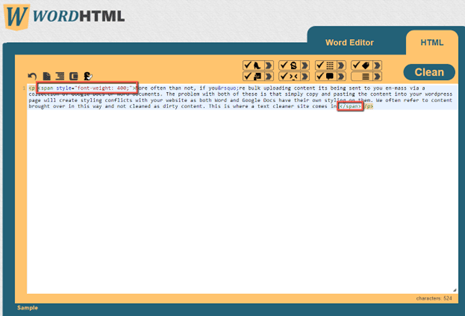
Text cleaning sites like https://wordhtml.com/ will remove all of the inline styles and miscellaneous spacing issues caused when copy and pasting from Word or Google Docs. All you need to do to clean your content is paste it into the Word Editor, swap to the HTML tab, and click “clean.” That’s it!
Simply swap back to the Word Editor and then copy paste the now clean content into your WordPress site. These extra few minutes will save an immense amount of time, down the road, for you or for the site’s developers.
Utilize “Post Type Switcher” to Move Pages Between Post Types
Have you ever created a massive amount of pages only to find out they were supposed to be a different post type? I sure have! You might think you need to delete all of the pages you just made and make them again – wasting hours of work time. Luckily, if you use “Post Type Switcher,” you only need to make a few clicks to fix this mistake


With this super simple plugin, you can easily move pages in the wrong post type to the correct one. If you only need to move on a specific page, simply click quick edit on the listing you need to move, go to post type, and change it to the correct post type.
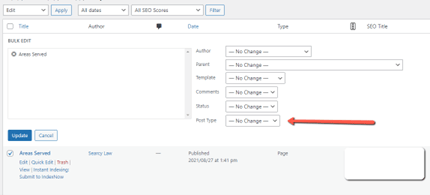
If it’s more than one page going to the same new post type, simply check the boxes on the left of the listings you want to move and then, at the top, click the dropdown where it says “Bulk Actions,” click edit, then move over to post type and change it to what you want.
All that’s left is making sure that the pages moved to the correct post type and that their hierarchy/parent page settings remain correct. If you are moving a page from a post type with a set template to one without, you may also need to verify that the template of the pages is set correctly.
If Working with Photos, Keep Your Photos Well-Organized in Folders
Working with photos can be extremely draining to keep organized as after you’ve edited, compressed, and uploaded any amount you may struggle to remember which have been completely worked with or not. That’s why it’s incredibly important to organize the folders you are using to keep the photos in while working with them. In addition, you should plan out your steps when working with them in order to stay efficient time-wise. These are the steps to follow when doing bulk photo work. (Note: these steps assume you are on a Windows PC):
- First set up a “Compressed” and “Done” folder within the folder containing all the photos you were sent. Pin both of these folders by right clicking and selecting “Pin to Quick Access.” With this, they should now be on the left side of your File Explorer (folder menus).
- Once your photos are compressed, drag them into the “Compressed” folder as you finish the batches of compressed photos. Once that is done, you can begin uploading photos to whatever site you are working on!
- As you upload each image, drag them into the “Done” folder to ensure you don’t double upload or miss any images
How to Organize Your Spreadsheets
A majority of bulk tasks I have worked on begin with a massive spreadsheet of some kind. Lines upon lines of work to be done can quickly become disorganized or worse, you forget where you were on the sheet and need to waste time figuring out where to start back after taking a break. A few tips can easily prevent this from occurring:
- Highlight any rows or elements that have been completed. If working from the top of a sheet and going down, this will always display where you left off either for your future self or for the next person to work on it.
- Create a column on the side for notes in case there is any extra information to be noted. This way you wont forget to report it later down the line.
- Use conditional formatting to visualize your data. By doing this, different data can be quickly and easily identified. For example, if working on a simple to-do list, creating formatting rules to highlight green if done and red if not will make the sheet much easier to read and figure out what work is left to be done.
And that’s it for this post! I hope you found this helpful and save some time in your future endeavors.
Remember, PaperStreet offers web hosting and support options where we can help with your all of your WordPress bugs and other website issues.Contact us to learn more.


