How to Setup and Install Google Analytics on Your Website (2026 Update)
Google Analytics is an essential tool for gaining insights into how users interact with your website. But before you can start analyzing data, you need to install it. Follow the steps below to set up Google Analytics on your website.
Step 1 – Create a Google Account or Use an Existing One
If you already have a Google or Gmail account, you can skip this step. Otherwise, follow these instructions to create a new account:
- Click here to get started, then click the “Create account” button.
- Select the appropriate account type and fill out the required information.
Step 2 – Set Up Google Analytics 4
Now that you have a Google account, you can set up Google Analytics 4.
- While logged into your account, go to Google Analytics.
- Click “Get started today” in the top right corner.

- On the next page, click “Start measuring.”

- Fill in the following details, then click “Next” after each step:
- Account name – Use your company name.
- Property name – Use your website address.
- Reporting time zone and currency – Match your location.
- Business details – Select the appropriate industry and business size.
- Business objectives – We recommend selecting all options.


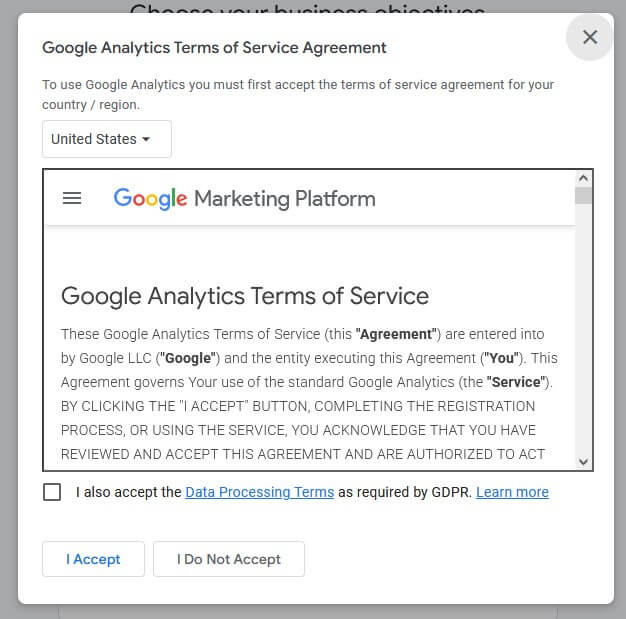
- Click the blue “Create” button at the bottom.
- Accept the Google Analytics Terms of Service Agreement to proceed.
- When prompted to “Choose a platform,” select “Web” unless you are tracking an app.

- Set up your web stream by entering your website URL and a stream name as an identifier.
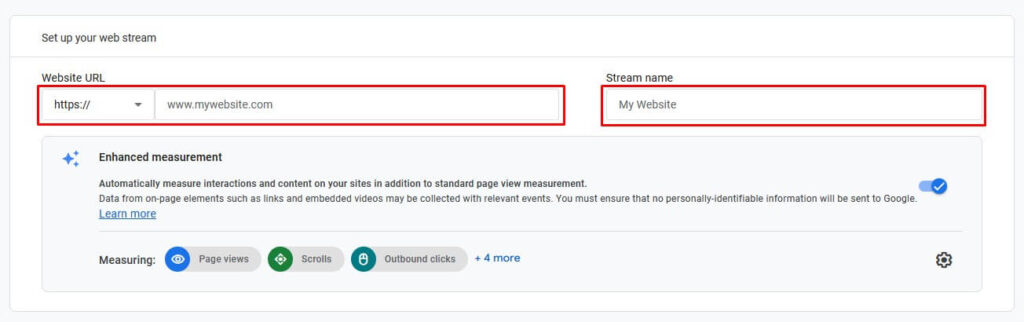
- Keep “Enhanced measurement” checked unless you want to disable specific tracking features. Click “Create & continue.”
- When prompted to set up your Google tag, select “Install manually” to view the tracking code.

Step 3 – Installing the Tracking Code
- If you are unfamiliar with adding code to your site, contact your web design company for assistance.
- Copy and paste the tracking code into either the header or footer file of your website:
- Header file – Place the code before the closing
</head>tag. - Footer file – Place the code before the closing
</html>tag
- Header file – Place the code before the closing
Step 4 – Verify the Tracking Code
To ensure that Google Analytics is properly installed, use the following methods:
- GA Checker – Enter your website URL at GA Checker and click “Start Checking” to confirm that the tracking script is detected.
- Google Analytics Realtime Report – Within your Google Analytics account, navigate to the “Realtime” report to check if user activity is being recorded.

Step 5 – Learn How to Use Google Analytics
Once the tracking code is installed, Google Analytics will start collecting data within 24 hours. Keep in mind that same-day data may be limited while Google processes new information.
Be sure to check out our guide on how to use Google Analytics for insights into your website’s performance and marketing campaigns.
Need Further Assistance?
At PaperStreet, we specialize in creating custom web designs that help law firms stand out and grow their practice. With our proven strategies and industry expertise, we ensure your website not only looks great but also drives real results.
Contact us today for a free consultation and discover how we can help you attract more clients and cases.
What you should do next . . .

SEO doesn't happen in a vacuum. Always be looking to continually improve and be open to changing landscapes.
Join our newsletter, where you will learn educational info on latest insights, tips and best practices.
Share:
About Us
Did you know more than 200 clients have worked with PaperStreet for more than 10 years?
Get a Free Website
Analysis and Consultation
Marketing Services