How to Properly Add Images to your Website for Better SEO & Speed Performance [Guide]

Images are a crucial part of any website design, but if they are not added correctly, they can do more harm than good. As a result, PaperStreet has compiled our tips and best practices on how to properly add images to your website with SEO and speed performance at the forefront.
Use the Correct Image Size
This is the most fundamental rule. Only upload an image with the size that is needed to fill the appropriate space on the web page. During our 18+ years of web experience, we have run across numerous instances where an image on a web page is much larger than it needs to be.
For example, we’ve seen high-resolution photos (which can be upwards of 3000 x 3000 pixels and 5MB in size) in use where it is not necessary for the image to be that large. The larger the image, the longer it takes to download to your browser, which negatively affects the load speed of your web page.
To further explain, if the space on the web page for the image is 300 x 300 pixels, you should be reducing the image down to that exact size. Use that image size for the web page and nothing more substantial.
How to Figure Out Image Size
It takes a bit of technical knowledge to know what size is needed so reach out to your web developer and they can provide the appropriate image dimensions.
However, if you are feeling tech-savvy, modern browsers like Firefox and Chrome have developer tools built in to show you the image dimensions. If you right-click on the image and click “Inspect Element” (on Firefox) or “Inspect” (on Chrome), a box model graph should appear showing you the image size of that area.
Firefox: 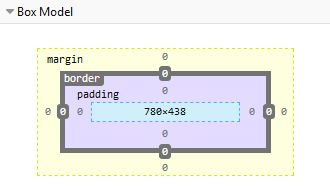 Chrome:
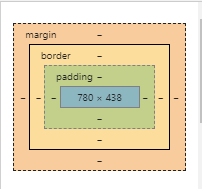
Also, there are add-ons (for Firefox) and extensions (for Chrome) you can apply to either browser that will also help you figure this out. Here are the links and description of the tools below.
- Measure-it (Firefox): https://addons.mozilla.org/en-US/firefox/addon/measure-it/
- Page Ruler (Chrome): https://chrome.google.com/webstore/detail/page-ruler/emliamioobfffbgcfdchabfibonehkme
How to Resize Your Image
Now that you have figured out the appropriate image dimensions to use, we can use an online tool to reduce the image down to the correct size.
- https://www.befunky.com/features/resize-image/
- Click “Upload an image” and select the appropriate image from your computer
- In the “Resize your image” section, enter the new dimensions, make sure “Keep Aspect Ratio” is checked
- In the “Select the output image format” section, select the appropriate option that matches the original image format
- Lastly, click “Resize Image” at the bottom and download your new image

How to Compress Your Image
Once you’ve changed your image to the appropriate size for the web page the work is still not done! We can take the process a step further and use another tool to compress your image. The objective is to make the file size even smaller for faster load speed.
This compression process occurs “By selectively decreasing the number of colors in the image, fewer bytes are required to store the data. The effect is nearly invisible, but it makes a very large difference in file size!” (from tinypng.com)
After you have resized your image, upload it to https://tinypng.com/ and then download the newly compressed image to be used for your web page. Afterwards, you will be able to see how much the image size has been reduced by in the tool.

Name your Images Appropriately
The final steps of the image process are for SEO purposes. It is important and recommended by search engines to have the file name of the image describe it appropriately.
The filename provides clues to search engines about the subject matter of the image. For example, “new-york-city-skyline-buildings.jpg” is a much better filename to use versus something generic like “IMG43435.jpg” which provides zero context.
This best practice is also helpful for getting your images ranked on the image section of search engines (e.g., https://images.google.com).
Add Alt Text to your Images
Finally, adding alt text to your images is also very helpful from an SEO perspective. Applying this attribute to your code helps browsers and vision-impaired users better understand the image. Basically, the alt text should describe the image to someone who can’t see it.
“When choosing alt text, focus on creating useful, information-rich content that uses keywords appropriately and is in context of the content of the page. Avoid filling alt attributes with keywords (keyword stuffing) as it results in a negative user experience and may cause your site to be seen as spam.” (from Google)
Adding alt text to an image does require some technical knowledge. Depending on the CMS (content management system) you are using to manage your website, the process may be different. It is best to reach out to your developer and they can guide you on the steps and how to do it.
However, if you are able to access the code for your website, you would simply update the <img> tag to include the alt attribute (e.g. <img src=”new-york-city-skyline-buildings.jpg” alt=”Photo of the New York City skyline buildings”>
For more information regarding best practices for images check out this additional resource: https://support.google.com/webmasters/answer/114016?hl=en
Questions or Feedback?
We would love to hear your feedback if this blog post has helped you to better understand how to properly add images to your website. Also, if you run into any issues, feel free to leave a comment below and we’ll do our best to help you out with a solution.
Further Learning
Are you interested in learning more about legal marketing? Head on over to our SEO Guidelines & Best Practices page. Our guide will teach you the do’s and don’ts for law firm SEO along with what we include in our SEO plans.


