WordPress Quickstart Tutorial for New Editors
With each successive update, the WordPress platform is improving its usability as a content management system (CMS). The latest update (3.1), makes linking to existing pages in your site easier, and it hides some advanced options. Because WordPress is so flexible and geared toward tech-savvy users, there are still a lot of available options when you log in to your WordPress admin area. If you’re new to WordPress, do not fret; the admin interface is intuitive and easy to learn.
Logging in to WordPress
If you are already logged in, the following URL will take you to the admin dashboard. Otherwise, you will be prompted to enter your username and password. Replace YOURDOMAIN with your actual domain name: http://www.YOURDOMAIN.com/wp-admin/
If only the blog portion of your site is in WordPress, then you will need to add /wp-admin/ after the URL of your blog. If you are a PaperStreet client, this information will be provided to you in your launch email: http://www.YOURDOMAIN.com/YourBlogName/wp-admin/
How to Edit Your Content
Page Content
 Once you log in to WordPress, you will be presented with the dashboard. To modify the content of the site, you only need to worry about a few sections on the navigation bar to the left. The pages on your site are housed under “Pages.“
If you click that section, you’ll see your website’s site structure. Dashes denote that a page is a sub-page of the one above. Click on whichever page you would like to edit. On the “Edit Page” screen, you can edit your text in the text editor. If you only see two rows of icons, click the last button “Show/Hide Kitchen Sink.”

If you would like certain text to be headings, you can select the text and change the format from paragraph to Heading 2 or Heading 3. Depending on the design of your site, heading 1 may be reserved only for the heading at the very top of the page. Click the big blue “Update” button, and you’re done.
To add a new page, click “Add New” on the side navigation or pages listing, then insert your page title and content. If your page should be underneath an existing section, then you will need to change the parent page. On the right side of the page, under publish, is Page Attributes. Here you can select the Parent page from a list of all pages on your site.
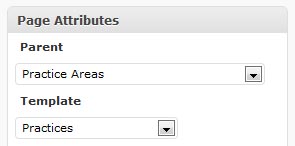
Templates in WordPress allow different sections of your site to have more than one layout. In our typical WordPress site, the Template option will stay as the “Default Template” for general pages. If it’s a practice area page, or attorney/staff bio page, then you may need to change to the appropriately named template.
Blog Content
If your site has a blog section, then this is edited through ” “Posts” on the left side navigation. Editing and adding posts is basically the same as working with pages, with the addition of an excerpt, categories, and tags. The excerpt is typically used to display the very beginning of your post (or a short summary) on the main blog page, with a Read More link that takes you to the full post.
Categories are like a table of contents for the posts in your blog. You’ll be able to see them listed on your blog landing page. They are used to organize posts into main sections, and they will help visitors find content related to what they want to read about. Choose at least one category for your post. Tags are used to add additional keyword/topics to your posts. I recommend keeping the number of tags low, in order to not have search engines index an excessive amount of pages with similar content. I like to use around 2 to 4 tags.
Additional Custom Features For Editing Your Site
Every WordPress build is a little different. If PaperStreet built your site, then any instructions for custom functionality should be provided. You may see one or more of the following while logged in:
Editable Areas / Custom Post Types
On the left main navigation, you may see other post types underneath “Comments” and above “Appearance.” Adding or editing these works the same as pages. If you see a link titled “Editable Areas,” this contains information that is repeated throughout the site, such as footer links, text in the header/logo area, or sidebar information. There may be other custom post types, such as news.
Custom Fields – Using Verve Meta Boxes
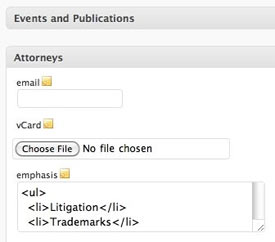 When editing or adding a page, you might see fields like these underneath the main content editor. They are used for custom file uploads, images, vcards, email addresses, sidebar information, thumbnails, and more.
Tabs on a Single page – Using Page.ly MultiEdit

You may also see multiple tabs at the top while editing a page. Paperstreet sometimes uses this on attorney/staff bios. This allows you to edit all of the different sections individually, such as practices, quotes, photo, etc.
WordPress Design and Support
If you are an existing client and need additional WordPress support, give us a call or email the development team via helpme (at) paperstreet.com. If you are interested in us building your site in WordPress or another content management system, then please fill out our contact form.


