How to Automatically Back Up your Google Docs to your PC
UPDATE: Program No Longer Works
“GDocBackup uses old Google APIs. The old APIs were shut down by Google. So GDocBackup stopped working. As I wrote on project homepage, I have no time to modify and maintain it. From my point of view, the job required on GDocBackup to use the new APIs is too big. Feel free to contact me if you need more details or other information.”
===============
A few months ago, there was a high-profile story online about how Google had lost a user’s documents stored on Google Docs. While this is not a common occurrence, you are going to want to keep a backup if you are storing important files that are key to your business. Hardware can fail, and documents can become corrupt or “unavailable.” The cloud isn’t always going to save you, and what do you do if there is an outage? It’s always best to keep at least one backup of your data.
Fortunately, there is a great open-source free program called GDocBackup that will export all your Google docs to your local hard-disk with the click of a button. This can be set up to run automatically.
Step 1 – Download and Install GDocBackup
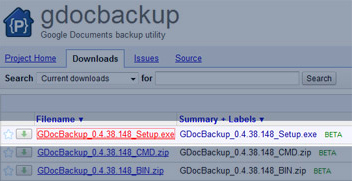
Download the latest Setup EXE from the downloads section of the GDocBackup Google project:
http://code.google.com/p/gdocbackup/downloads/list
Install the program on your PC.
Note that it is available for Mac and Linux, but if you are on those operating systems then you will have to set up the scheduled running of the program in Step 3 differently than is covered in this tutorial.
Step 2 – GDocBackup Configuration
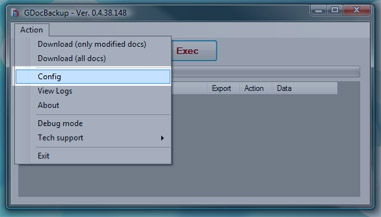
After the program is installed, run it and click Action -> Config on the menu bar.
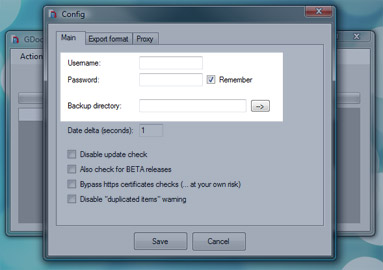
Enter the username and password of the Google account that you are downloading the documents from. Check off ‘Remember’ password. You may also want to check off “Disable ‘duplicated items’ Warning.” When we back up our projects, there are always one or two files that show up as duplicates, which can be an annoyance.
Choose the backup directory where you want the files stored. We back up ours to a local network drive.
Step 3 – Set up a Scheduled Task
In lieu of running the program every time you want to back it up, you can set up a scheduled task to run the backup automatically. I have mine set to run every day in the evening. Another office computer runs it every morning.
To run Task Scheduler,
- Open the Start Menu
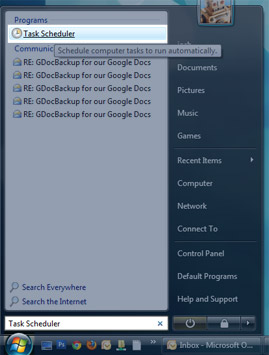
In the white line (Start Search) area, type Task Scheduler and press Enter or Click the Icon that appears from the search (see screenshot below).
or
In the white line (Start Search) area, type taskschd.msc and press Enter. - Or Open the Control Panel in Classic view
A) Click on the Administrative Tools Icon.
B) Click on Task Scheduler.
In the Task Scheduler, click Create Task. Name your task and give it a description:
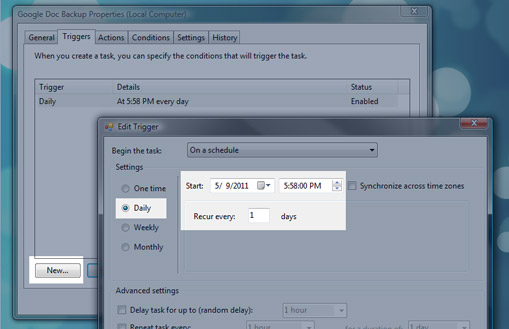
On the second tab, Triggers, click New. Then set up the time interval at which you’d like GDocBackup to run. This should already be set to ‘Enabled’ at the bottom.
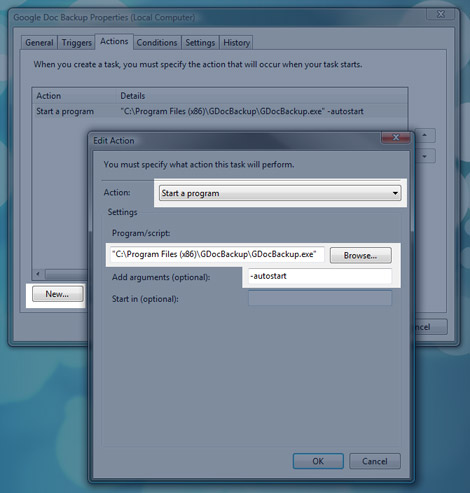
Click on the third tab, Actions. Set the action to Start a Program and click Browse by Program/script. Locate the GDocBackup EXE file in the Program Files folder. In Windows Vista/7, this defaults to:
- C:\Program Files (x86)\GDocBackup\GDocBackup.exe
In the arguments field, put:
- -autostart
This is important, as it allows the scheduled backup to run without your intervention.
That’s it. Click Okay as necessary to apply these configuration changes, and your docs are good to go. You should see the backup pop up and run at the scheduled time, and then disappear when it is finished.
